
 |
| THEa Elements focal with (Japanese 12-2) flower chain and handcrafted clasp |
Heather Powers of Humblebeads has an ongoing Mojo jewelry making challenge on her blog. For week four, she asked participants to create findings to use in jewelry design. I LOVE creating findings! I started jewelry making by creating French ear wires, and eventually focused a great deal on wirework, specifically chainmaille. I love experimenting with various types of wire -- square, half-round, copper, brass, antiqued Vintaj Parawire, German wire, anodized aluminum, and enameled!

Above, I've created earrings that feature wire as a big part of the design -- the wire celebrates the Metal Me This bead caps by Lisa Liddy, using the caps & the wire in an unusual way. The square Vintaj wire looks "relaxed" above the bead caps and above the handcrafted lampwork spiral discs, and the wire holding the bead caps isn't cut, but becomes the earring findings.
Likewise, wire becomes earring stud posts that are both part of the earring construction & the earring design in the MOP seahorse earrings below. Headpins become the eyes of the seahorses and work as components that allow the carved beauties to gently move from the Czech post findings.

I almost always make my own clasps, or use clasps created by others, in my jewelry. I enjoy creating unique closures to accent designs, such as the spiral clasp shown below. Working with copper and brass and Argentium silver wire to create rings for chainmaille, I have lots of 14 AWG and 16 AWG wire on hand for exploring ways to sculpt clasp designs.
 |
| Triple row byzantine, gem, and sari ribbon bracelet with spiral brass clasp |
For our challenge, I decided to upscale the traditional s-clasp to include handcrafted lampwork. Not a unique idea, I know, but one I've wanted to try for some time. And I have to admit, forging wire with lampwork on it was a little scary and definitely challenged me! I did not want to break the lovely glass beads by Sue Kennedy of SueBeads!

In hindsight, I might try the plastic tubing made for steadying lampwork beads on wire (or string) by filling the hole. I used square, twisted German wire to coordinate with my twisted brass jump rings, and although it worked fairly well, I think a non-twisted, half-round wire -- to use as in wire wrapping -- might be most secure, keeping the bead in place the best.
I also learned that properly annealed lampwork is safe in my tumbler. S-clasps made with lampwork can be filed and sanded by hand or tumbled for no longer than one hour. See the free "Tumbling Magic" PDF tutorial by Wired Up Beads (Wubbers) for excellent info on tumbling findings.
 |
| Helm chain created using Artistic Wire jump rings, with chrome diopside and blue jade rounds, Vintaj beadcaps. TJ. |
Creating handcrafted with handcrafted and incorporating handmade findings and chain brings jewelry design to an even more unique artistic level. For me, creating clasps naturally came after earring findings and alongside all the wireworking of chainmaille. So, I thought I'd also contribute to Heather's challenge by stirring up some chainmaille mojo too and include instructions for Helm Chain, the next weave in my chainmaille tutorial series.
Here is it is, Helm Weave, also called Parallel weave, in a nutshell:
 |
| TOLTEC JEWELS TUTORIAL |
Helm weave is made with two ring sizes: either use 20 AWG 2.8 mm and 20 AWG 4.8mm OR 18 AWG 3.5 mm and 18 AWG 5.9 mm.
Previously I discussed tools for chainmaille, so if you have your chainmaille mandrels and/or digital caliper, whip up some jump rings to give the weave a go. If using the 20 gauge rings for Helm weave, you'll need about four small rings and seven large rings per inch. If you are using 18 gauge rings, you'll need about six small and nine large rings per inch.
 |
| Helm Weave Basket Earrings in antique copper, by Toltec Jewels |
Try creating a bracelet or elegant earrings. You can double the small rings (as in the necklace photo above the instruction pictures), or use single small rings depending on your design. Here are some cool ideas for Helm weave:
Create "Cool Summer Breezes"
 |
| Photo of "Cool Summer Breezes" at Interweave |
Designed by Lauren Andersen, these pretty earrings are simply a circle of Helm weave chain stabilized with additional center rings and embellished with Swarovski bicones using Fireline. The design is fun and versatile. Originally published in Step By Step Wire Jewelry (Spring/Summer 2010), instructions are available at Interweave for $4.00. You'll also find the instructions in the e-booklet, "Ten Wire and Crystal Projects" for $9.95. All instructions are instant digital pdf downloads.
Create "Chain Mail Flower Earrings"
 |
| Photo of "Chain Mail Flowers" at Kalmbach. |
Designed by Mary Rembach for Kalmbach, these pretty flower earrings are Helm weave made to form a slight dome or bowl shape that is stabilized with a center bead and wire. The design works as earrings, a delicate pendant, or as bracelet components. The instructions are available as an instant digital pdf download at the Kalmbach Bookstore online for $1.99.
Create "Helm Basket Earrings"
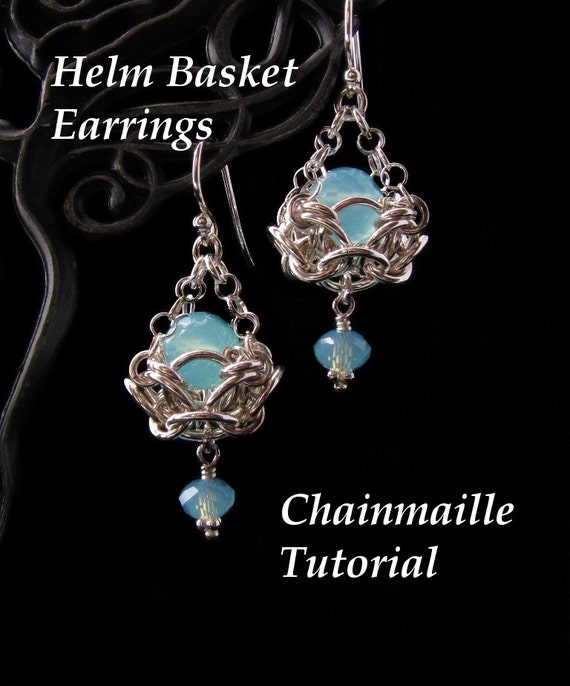
Available at Wolfstone Jewelry on Etsy, the Helm weave basket earrings (or pendant) tutorial is available as an instant digital download for $7.00. I LOVE this design, and easily substituted my antique copper Vintaj Parawire, Artistic wire non-tarnish rings, and Vintaj chain for the silver rings. Wolfstone Helm Weave Baskets can be made with a number of metals, and you'll find this design a little more challenging, but again, it is simply Helm weave! Have fun.
Create my Helm Flowers (upcoming)


Designed one evening after creating and embellishing beadwork bezels and Super Duo components, I dazzled Helm weave up with "stardust" rings, pearls, and Swarovski bicones. My Helm flowers will be upcoming in this tutorial series as I would like to submit the design for publication this summer. In the meantime, see how you can use Helm weave to create elegant bracelets, sophisticated necklace chains, and embellished components for all kinds of jewelry.
No comments:
Post a Comment
Gracias for your comments and for visiting! I appreciate every word :)
Namaste --
Rita